Wedding websites have become a common part of modern wedding planning. They’re simple online pages where couples share important details about their celebration in one place.
Instead of answering the same questions over and over, couples use wedding websites as a central hub for guests. People can check the ceremony time, venue, dress code, travel details, or registry anytime without needing to text or call. It keeps everything organized while making communication with guests much easier.
If you’re wondering how to create a wedding website, the process is simpler than it sounds.
What is a wedding website, and why do couples create one?
Like we mentioned earlier, wedding websites act as a central hub where couples share all the important details about their celebration. Instead of scattering information across invitations, texts, and emails, everything lives in one place that guests can check anytime.
Most couples use a wedding RSVP website to manage responses digitally. Guests can confirm attendance, add a plus-one, and sometimes choose meal options, while couples can track everything automatically.
These sites also help guests plan ahead. Couples often include travel tips, hotel recommendations, venue maps, event schedules, and registry links, so guests know exactly what to expect.
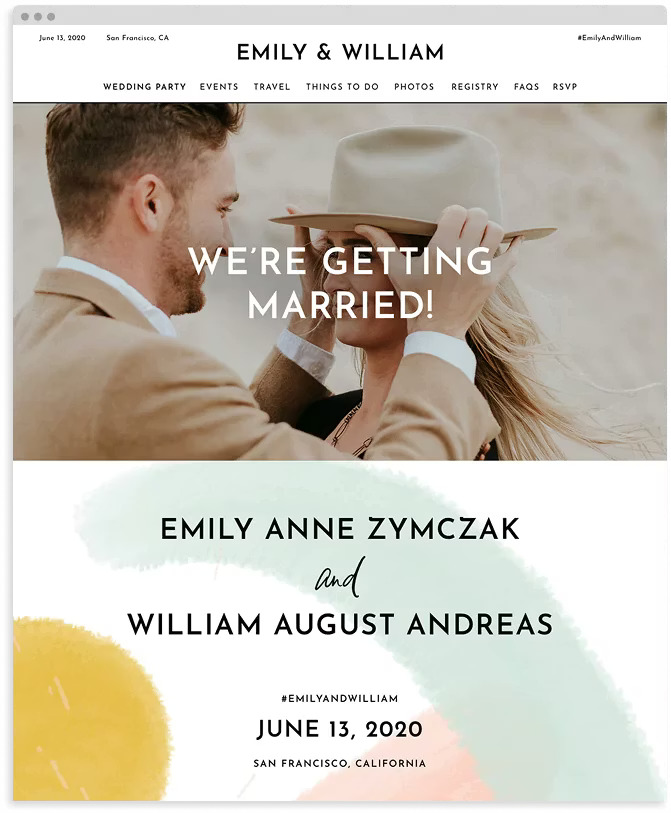
Beyond logistics, wedding websites also give couples space to share their story. Many add sections about how they met, their engagement, photos, or introductions to the wedding party so guests feel more connected to the celebration.
Some couples also add extra features for convenience and privacy. For example, a wedding website with QR code makes it easy for guests to open the site instantly from an invitation, while a password protected wedding website keeps event details visible only to invited guests.
When to create a wedding website
Most couples start building their wedding websites about 10 to 12 months before the wedding. Once the date and venue are confirmed, you can begin setting up the site even if many details aren’t finalized yet.
The usual approach is simple: create the site early, add the basic details first, and update it as planning progresses. Many couples start with the wedding date, location, and a short welcome message.
The website is typically shared when save-the-date cards go out, which is usually 6 to 8 months before the wedding. Including the link or QR code allows guests to check travel details, accommodations, and other updates as soon as they receive the announcement.
The key is to treat the website as a living resource. Couples often build it early and gradually add things like registry links, event schedules, and FAQs as plans come together.
Step-by-step: How do I set up a wedding website?
Once you decide to create a wedding site, the next step is setting it up. Most couples follow a simple process: choose a platform, customize the design, and create a URL guests can easily access.
You don’t need technical skills to get started. Most tools are designed for beginners and walk you through each step with templates and built-in features.
Step 1: Choose a wedding website builder

The first step is choosing a wedding website builder, which is the platform you’ll use to create and manage the site. Popular options include Zola, The Knot, Joy, Minted, Wix, and Squarespace, which are often listed among the best wedding websites and top wedding websites couples use today.
These wedding website platforms usually include templates, RSVP tools, registry links, and guest management features. If you’re deciding which to use, start by comparing ease of use, design options, and the tools you’ll need for guest planning.
Many platforms offer free wedding websites with basic templates and planning tools. Paid upgrades usually add custom domains, deeper design control, or expanded guest features, but most couples spend between $0 and $200 total.
Step 2: Pick a template and customize the design
After choosing a platform, select a template that matches your wedding style. Templates give you a ready-made layout with sections for schedules, travel details, registry links, and your story.
From there, customize the design to make the site feel personal. Most builders let you adjust fonts, colors, layouts, and photos so the site matches your invitations or overall theme.
Adding engagement photos, galleries, or simple design touches can turn a basic template into an awesome wedding website guests remember. The goal is to keep the design clean, personal, and easy to navigate.
Step 3: Create your custom wedding website URL
Next, create the web address guests will use to access the site. Many couples use a simple format based on their names, such as “alexandjordan.com” or “thesmithwedding.com.”
Most platforms provide a free URL automatically, but you can also purchase a custom domain if you want a shorter, cleaner address. Custom domains usually cost about $10 to $20 per year.
Some couples also enable privacy settings. A password protected wedding website only lets invited guests view the details. This helps keep schedules, locations, and guest information private while still making the site easy to share.
Step 4: Add essential wedding details
Start by adding the information guests will look for first. This usually includes the ceremony time, venue address, reception location, dress code, and the overall timeline of the day.
Many couples also include travel guidance and accommodation suggestions for out-of-town guests. Registry links are typically placed here as well so guests can easily find gift options.
Keep everything organized in clear sections. Guests should be able to scan the page and immediately find the details they need.
Step 5: Set up RSVP and guest management

Next, activate the RSVP feature so guests can confirm attendance online. A wedding RSVP website allows guests to respond digitally instead of sending back paper cards.
Most RSVP tools also collect helpful details such as meal selections, plus-one names, and dietary restrictions. The responses are automatically organized, making it easier to manage the guest list.
This setup helps couples track who has accepted, declined, or hasn’t responded yet. It also simplifies coordination with vendors like caterers and planners.
Step 6: Write the content for your wedding website
Once the structure is ready, add the text that gives the site personality. This is where wedding website wording comes in. Cover sections like the welcome message, your story, and introductions to the wedding party in a way that sounds like you literally speaking to your guests.
Most couples keep the welcome message short and friendly. Then they add a brief story about how they met, important moments in the relationship, and the proposal.
A section for the wedding party is also common. These short introductions help guests understand how each person is connected to the couple.
Step 7: Test the website before sharing it
Before sending the site to guests, test everything carefully. Open the site on a phone, tablet, and computer to make sure it loads correctly on different screens.
Check the navigation and confirm that links, maps, and registry pages all work. Proofread the content as well to catch spelling errors or incorrect details.
Finally, submit a test RSVP to make sure responses are recorded properly. If you’re planning to share the wedding website with QR code, test that too to confirm it opens the correct page. A quick review helps avoid confusion once guests start visiting the site.
What to include on a wedding website
Your site should make it easy for guests to find the details they need without contacting you. Most couples organize wedding website content into clear sections so guests can quickly check logistics, travel plans, and other important updates.
Common sections couples include:
- Essential wedding details: Ceremony time, venue address, reception location, dress code, and a simple timeline of the day. Guests often check this section first to confirm when and where everything is happening.
- Travel and accommodation information: Hotel blocks, transportation instructions, parking details, and map links. This section helps out-of-town guests plan their trip and arrive prepared.
- Your love story and wedding party: A short story about how you met, your engagement, and the people standing with you on the wedding day. These personal sections make the site feel more welcoming and help guests feel connected to the celebration.
- FAQs for guests: Answers to common questions about dress code, parking, plus-ones, or whether children are invited. Keeping these answers in one place prevents a lot of last-minute texts and emails.
- Other notes and extra details: Couples often add local restaurant suggestions, weekend activity ideas, registry reminders, or instructions for additional events like welcome dinners or brunches.
You can also add a section to help guests participate in special moments during the celebration. For example, couples using The Toast often include a page with the event code, a QR code to download the app, and simple instructions for recording a message.
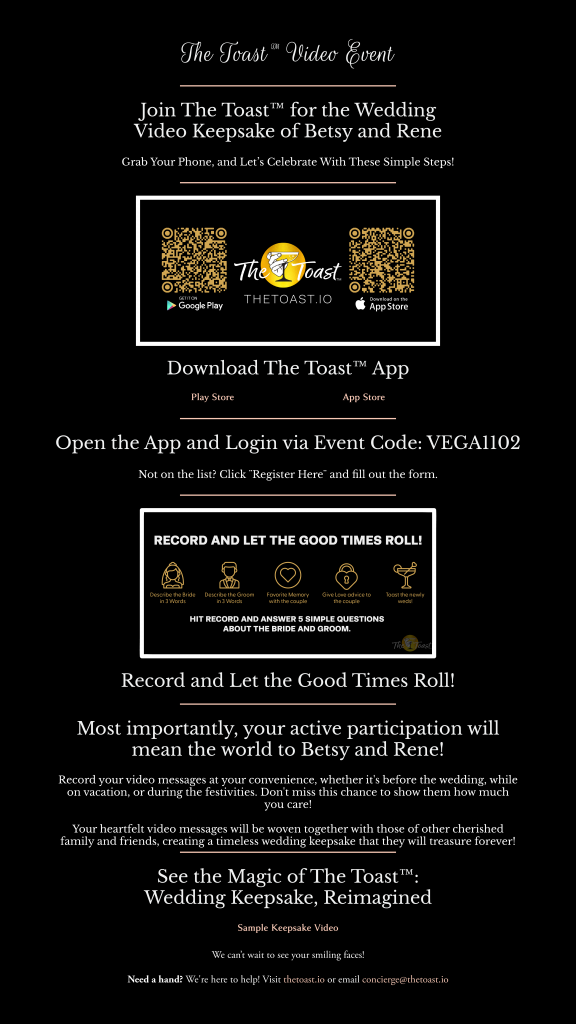
| Pro tip: Turn it into something fun and personal. For example, you could share a photo and ask guests to guess what happened next: “We’re not telling you the full story behind this moment just yet. When you download The Toast app and enter our code, tell us what you think happened next.” You can even guide them with options within the prompt like, “Do you think…” – This was right before the proposal – This is part of our engagement photo shoot – One of us had no idea what was coming Adding prompts like this makes it easier for guests to participate and often leads to more memorable responses. |
Wedding website cost: Free vs. paid options
The wedding website cost depends on the platform and the features you choose. Many couples start with free tools and only pay for upgrades if they want more customization.
Typical wedding website pricing looks like this:
| Option | Typical cost | What you get |
| Free wedding websites | $0 | Basic templates, hosting, RSVP tools, registry links, guest list management, and event pages |
| With custom domain | $10 to $20 per year | A personalized web address (for example, yournames.com) that’s easier for guests to remember and share |
| Premium templates or design upgrades | $10 to $50 | Additional template designs, more customization options, and removal of platform branding |
| Website builder subscription | $10 to $30 per month | Deeper design customization and advanced website features |
| Fully custom website design | $500 to $3,000+ | A professionally designed website with unique layouts and custom branding |
For most couples creating the site themselves, the total wedding website cost usually falls between $0 and $200. Even with a custom domain or upgraded design, it’s still one of the more affordable parts of wedding planning.
Tips for making a great wedding website
A great wedding website should be clear, helpful, and easy for guests to navigate. The goal is to make important details simple to find while still showing a bit of personality.
A few simple tips can make a big difference:
- Keep content simple. Use short paragraphs, clear headings, and direct wording so guests can quickly scan for details.
- Use photos to personalize the site. Engagement photos, favorite couple pictures, or venue images help make the site feel more personal and visually engaging.
- Organize pages clearly. Group information into logical sections so guests can find what they need without searching.
- Make it mobile-friendly. Many guests will check the site on their phones, so make sure text is readable, images resize properly, and navigation works smoothly on smaller screens.
Final thoughts
A wedding website helps guests stay informed before the big day. But the memories created during the celebration deserve a place to live long after it’s over.
Your website organizes the details that bring everyone together. The moments, stories, and messages shared during the wedding are what make the celebration truly meaningful.
That’s where something like The Toast comes in. While your website helps guests prepare for the event, The Toast helps capture the voices, stories, and messages that make the day unforgettable.
FAQs about wedding websites
Is it free to create a wedding website?
Yes. Many platforms offer free wedding websites that include hosting, templates, RSVP tools, guest list management, and registry links. Couples usually only pay if they want upgrades like a custom domain or premium design features.
What are common wedding website mistakes?
One common mistake is leaving out important details such as transportation, parking, or accommodation information. Others include forgetting to update the site, using a confusing RSVP setup, or not checking how the site looks on mobile devices.
What not to put on a wedding website?
Avoid posting private events that not all guests are invited to, such as rehearsal dinners. It’s also best to skip sensitive personal information and overly long text that makes important details harder to find.
Which wedding website builder is easiest?
Most beginner-friendly tools come with templates, guided setup, and simple editing features. Platforms like Zola, Joy, The Knot, and Minted are popular because couples can build a site quickly without technical skills.
Can you password-protect a wedding website?
Yes. Many platforms allow couples to create a password protected wedding website so only invited guests can view the details. The password is usually shared on invitations, save-the-dates, or email updates.